Wednesday, June 24, 2009

Parmesan Chicken

I had the day off today with absolutely nothing to do, so I offered up my services to prepare our family meal tonight. I had done some more recipe hunting the other night, and came upon this amazing-looking Parmesan Chicken recipe.

Parmesan chicken? you say? Not Chicken Parmesan? Oh no! Parmesan chicken is MUCH different, but still quite tasty. I found this recipe at Simply Recipes while searching for something that wasn't pasta, since I made pasta for my family last time. This recipe looked simple and tasty, so I made a Kroger run to get the ingredients I was missing and came home to start cooking because my mother and sister had to be at VBS at our church.


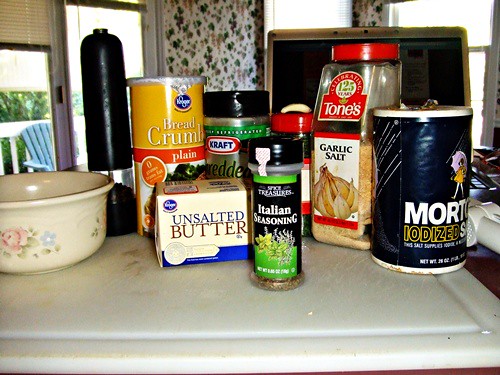
First I gathered my ingredients.

~1 Minced clove of garlic
~1 Stick of unsalted butter, melted (though it isn't melted yet! I didn't want it to congeal!)
~1 Cup of plain, dry breadcrumbs
~1/3 Cup of grated Parmesan cheese
~2 Tblsp of fresh parsley (except I used dried, I do not know if it really matters, but it was easier that way... And ya know, college cooking = going the simplest way possible)
~1/4 Tsp of salt
~1/4 Tsp of garlic salt
~1/8 Tsp freshly ground black pepper
~1 Large pinch of Italian seasoning
~2 Lbs. of boneless/skinless chicken breast (not pictured, it was still defrosting!)


The first thing I did was to combine all of my dry ingredients (minus the minced garlic) into a bowl...In my ingredients list the Parmesan cheese was shredded, and here it is pictured grated... Well, remember when I talked about the AMAZING supernatural powers of the Magic Bullet? Well, its powers came in handy once more and turned my shredded Parmesan cheese to grated. So convenient!

You may notice that


And mix thoroughly. I just used my hands, but you could use a fork or a whisk if you really wanted to.


My next step was to successfully cut my boneless, skinless chicken breasts into chunks that were about 2x2. Some of them were slightly larger, some smaller, but I wasn't mad about it.


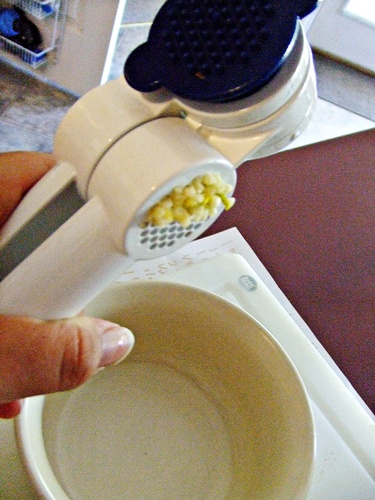
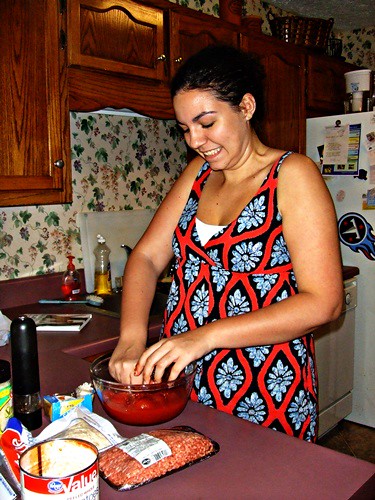
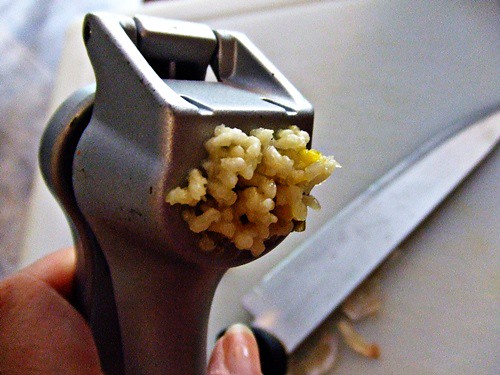
Then I minced some garlic, using another nifty garlic press that my parents own.


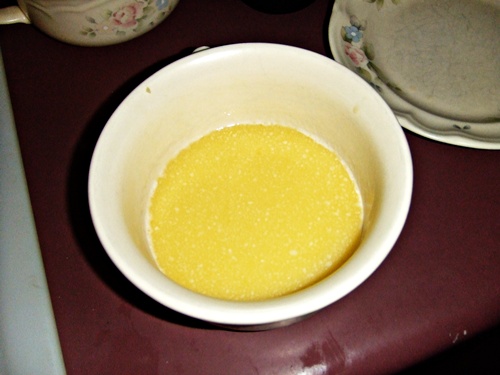
And then added the melted butter to form a savory garlic butter. Yum, unsaturated fats.

So then what happens next is you take a piece of chicken, soak it in the garlic butter for a second and then roll it around in the rather fragrant coating. Once a piece is successfully coated on all sides, place it on a 9x13 baking sheet. The directions say to add the excess garlic butter on top of the pieces on the sheet, but what I had left in my bowl of garlic butter was a thick mess of breadcrumbs and congealed garlic butter... So I decided to skip that step and go straight to cooking!


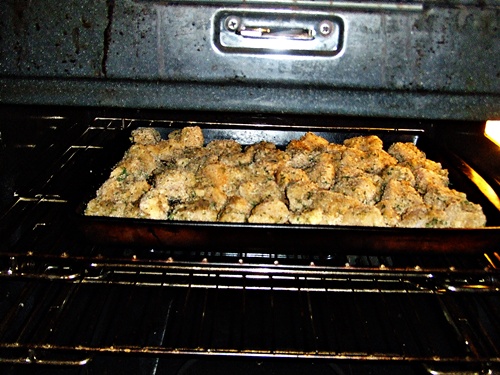
Once your dish is full, pop it into a 450 degree oven and bake for 15 minutes. After fifteen minutes, the chicken was fully cooked all the way through, but the coating on it was still a little soggy, so I put it in for an extra 4 minutes so that it could crisp up a little bit.
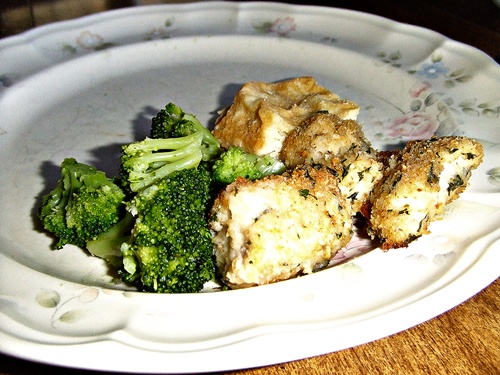


The finish product!

I decided to steam some broccoli and warm up some rolls left over from my sister's wedding and use those as side dishes.

I found that the chicken tastes a lot better when you let it cool for 5-10 minutes because otherwise, if you serve it too hot the coating comes off the chicken and the steam kind of muddles the flavor; but if you let it sit, then the coating is perfectly attached to the chicken and the flavors get a great chance to be expressed.

My family really enjoyed this recipe. My little sister even told me that it was good, which I feel is a great compliment!

Actually cooking this dish was a lot of fun, and it was very easy, too. Simple side dishes work well with it, and the 5 boneless, skinless chicken breast pieces I used were too much for 4 adults to eats, so there are plenty of leftovers!

Thanks for reading!


If you want to check out the original recipe, you can find it HERE

Monday, June 22, 2009

Chocolate Covered Oreo Cake

So Father's Day was yesterday, which in my family always means that dad gets to do whatever he wants to do that day. My dad spent his morning playing golf, then went to church, then spent the rest of his day relaxing and watching the sweet golf tournament that was on television. Father's Day ALSO means that there will be a fabulous meal, followed by a rather decadent dessert, which is how I got roped into this whole mess.

We decided to get dinner from this Chinese restaurant that we love, but I volunteered to make a dessert for the family since I'm on this cooking kick. So I set off to scour the blogs and search for something that would please my papa's palate (aka: chocolate). I came upon the most awesome recipe ever.

Dine and Dish, found via my favorite web site, Food Gawker, makes the most amazing Oreo Cake I have ever seen. Sure, you buy a cookies and cream ice cream cake and pop some Oreos on top and call it an Oreo cake, but this one by far was most holy in the land of Oreo Cakes.

I would have taken more pictures, but my older sister was helping me and we were having far too much fun trying to remove the cream cheese from the electric mixer beaters to remember our cameras until the process was nearly complete, but here are the ones I do have!


Here are our two 9-inch round chocolate cakes. I used a Devil's Food store bought cake mix which is what the recipe called for (and I have never before made a cake "from scratch" and didn't want to mess this one up!). However, the cake came out a little dry, which was pretty disappointing. For super-moist cake mix, I would recommend Betty Crocker. She's got some sweet pudding-cake mixes that just make the cake come out perfectly moist every time. The dryness of the kind that we used, at least for me, really detracted from the overall taste of the cake.


Next we have the filling, which is cream cheese, sugar, whipped cream and crushed oreos. Let me just tell you to be really careful when you try to use a mixer with cream cheese. The stuff we used wasn't quite soft enough yet, so it got all sorts of stuck inside the beater, which was no bueno for me. I had to scrape it out and it got really annoying at the end. However, it did soften up a little bit and was flying out all over the place, so that's always good, right? Anyways, this is the finished product. It was sweet, creamy and chock-full of delicious pieces of double-stuffed oreos! (Which my sister and I thought would be a fabulous idea since who would choose regular oreos over double stuffed? But we soon learn that crushing double stuffed oreos is difficult because the cream sticks to your bag and is just such a mess!)


Then we made this delicious chocolate dip, which is melted butter and melted baking chocolate. The recipe said 2 minutes to melt it, but we did it in 30 second increments 3 times, so only a minute and a half to get it completely melted. This stuff was one of the best parts of the cake, as when it cooled, it created this delicious ganache-like shell over top of the cake. Yummm.


Here is the finished product! To assemble the cake, you take the bottom layer and lay it top-down on your dish, then cover the top surface with your cream filling, then place the 2nd layer top-up. After you are sure that the layers aren't going to slide apart, you take your cooled chocolate dip and poured it over the top. I poured it all in the center, then smoothed it around with a spatula to get it to drip down the sides. It got a little messy, and if I want to try that again I should probably do it when the chocolate is a little less viscous. It kinda globbed down instead of ran down. But we learn from our mistakes, right? For the topping, on Dine and Dish, they used regular crushed oreos, but my sister and I were tired of the gooey mess that made, so I decided to take 6 oreos and put them in the almighty Magic Bullet and ran it for about 15 seconds to get these amazing super light and powdery crumbs that I just sprinkled over the top. If you have a magic bullet and ever need to make an oreo crust, or Oreo Truffles, I totally recommend using double-stuffed oreos and blending them up because the cream helps it stick together really well. But again, I digress.


And here it is with a nice, tasty slice taken right out of it. I have to admit, the cake was pretty darn good. The chocolate dip on the top plus the oreo crumbs were a great combination, and the filling was sweet but not overly so like the filling of regular oreos are. I was very pleased with the results, except for the dry cake.

My family all loved it, though! I am a little critical of myself, but that's alright.

So I've found my mistakes and things I would like to improve on for this (rather cheap) recipe:
- Use a more moist cake mix
- Soften cream cheese ALL THE WAY to make mixing easier
- Pour the chocolate dip before it gets too thick, or create a border around the top to hold it in and keep it from running down the sides cause it looks kinda sloppy
- Double stuffed oreos may or may not be the best idea for this recipe

And things that I LOVED about this recipe and how it turned out:
- The dip and oreo combination
- The light sweetness of the filling
- The simplicity of preparing this recipe
- How cost-effective it was. (Granted we had most of these ingredients already in the house, but we bought cake mix, a huge tub of whipped cream, the package of oreos and the Baker's chocolate for $10.00 which I feel is a pretty good deal, considering ordering a cake would be about $25.00)

And once again, you can find the recipe for this cake HERE

Thanks for reading!

Saturday, June 20, 2009

Pasta Pie

I know, I know. I started this blog three weeks ago and am just now getting around to updating it, but I'm not mad about it, so you shouldn't be, either.

I've had quite an interesting few weeks, with my laptop crashing twice in a 2 day period, attending camp for a week and getting a new kitten (kitten, kitten,kitten), but last week I tried out my very first recipe! I picked a pasta dish, since I figured it would be something easy to start out with, and I was mostly correct.

The recipe I decided to try was the Pasta Pie, which I found on Noble Pig via FoodGawker. (Sorry, I'm a little link happy today.) So without much more ado, here's some photo documentation that I actually attempted this recipe!


First things first: The Ingredients.
Pictured here are:
Ground Beef
Whole tomatoes
Rigatoni
Mozzarella
Parmesan cheese
Garlic cloves
Pepper


Before we start anything, though, the noodles must begin boiling! So here they are... Boiling.

I've never been the best judge at Pasta. When eating it regularly, I prefer for my noodles to be pretty soft and squishy. I am very textural, so rubbery pasta is not my favorite thing to eat.


I know that the recipe on NoblePig's site said to use the highest quality ingredients to make this dish the best it could be, but in all reality, I am going to be at school and (possibly) working a part-time job, so I won't have the money to pay for high-quality ingredients... So we've got generic brand canned whole tomatoes... Which I had to crush myself.


I know, you can SEE my elation at squishing these tomatoes. Every time I squeezed one with my (accurately cleansed hands), it would squirt tomato juice all over the counter and my dress. Not a clean activity... Plus, my hands were red for quite a while afterwards.


I eventually had to take this handy dandy tool and finish the job, because my hands just weren't cutting it.


Next, I crushed some garlic with this equally handy-dandy tool. (As you can tell, my mother is quite the Pampered Chef fan.)


The pasta was done (I think?) so I took it out, strained it and tossed it with a tablespoon of olive oil, then set it aside.


Then it was time to brown the meat, which was also completed with the help of that sweet mix/chop/mash tool that I used for the tomatoes.


While the meat browned, I did a little sidework with buttering my spring-form pan and cleaning up the mess I'd created so far.


Once the meat was finished browning, I added the garlic, crushed tomatoes and some freshly ground pepper. It was left to simmer for about 20 minutes. Note to self: Don't use so much olive oil to cook the meat/drain some of the juice/oil out before adding the tomatoes.

So while the sauce was simmering (and making my kitchen smell AMAZING) I took on the part of this recipe that I was dreading... It was the crucial piece of this dish, and I could only pray that it would go well!


I added a cup of shredded/grated Parmesan cheese to the noodles and gave a few tosses to get all of the noodles nice and coated.


Then I began the process of putting the pasta into the pain... Which was pretty frustrating at times. The pasta (generic brand) was not the same height at all, and many of the pieces were broken and hard to stand up. My fingers got pretty oily/cheesy, too... But it was still fun, and the finished pan...


Looked very pretty!


I was very, VERY pleased with how it looked when I was done. It looks like you have it filled up when you first get the pan full of noodles, but there is ALWAYS room for more.


The leftovers!


So here is the nearly-finished-project! The meat sauced packed all up into those noodles!


Baked in the oven for a bit...


And then the cheese added!


The finished product!


So here is a slice! I made garlic-bread-sticks and a nice Caesar salad to eat with it.

So a review of MY version of this recipe?... Well, I felt like the sauce could have been more saucy than chunky. It didn't get down into the noodles the way NoblePig's did. Plus, like I said above, the amount of oil/fat juice that was in the meat when I added the tomatoes made it kinda soupy with big chunks of the meat and tomatoes... So I think next time I'll actually try crushed tomatoes and maybe even a little bit of spaghetti sauce to give it a more Italian-y flavor instead of a Fazoli's flavor.

Thanks for reading! Until next time!

And if you would like this recipe, once again here is the link to NoblePig's website: When the moon hits the sky...

Tuesday, June 2, 2009

My First Post!

There comes a time in all young peoples' lives where they must come to grips with the fact that they have to grow up and learn how to do things themselves. Just like our parents will not always be there to clean our rooms and do our laundry, they will certainly not always be there to cook. 

Come August, I will be living in an apartment-style dormitory which comes complete with a mostly fully-functional kitchen. I'll have access to an oven/stove, which is awesome considering the dorms I lived in last year only contained a microwave/refrigerator combo. It was awful. I survived off of Chik-Fil-A and mutilated waffles... But now, with the proper tools, I can cook food that won't gain me a "Sophomore 15" and is actually good

There's only one problem:
My cooking abilities are limited to mixes that come out of boxes. Macaroni and Cheese, Cake Mix, Pasta Salad, etc. Oh, I can make scrambled eggs pretty well, too, but other than that, nothing! 

So I have decided to start this blog. Hopefully, with my posts, I can prove that just about anyone can cook! I "Wannabe" a Chef, or at least be able to cook like one... So here goes nothing! Wish me luck... I'm probably going to need it.